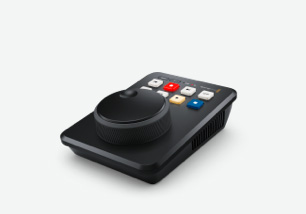
The advanced operating system designed for film and television!
HyperDeck Shuttle features the same advanced Blackmagic OS software as used on Blackmagic Design's digital film cameras, so you get an advanced operating system that’s designed for the tough technical requirements of the film and television industry. All settings can be accessed with a single tap on the front panel menu button, so you can adjust all settings for recording, monitoring, audio, disks and setup. Each HyperDeck feature runs as a self contained app running on top of Blackmagic OS, so all functions feel smooth without feeling stalled or delayed, plus you get exceptional overall stability. Best of all, Blackmagic OS is upgradable so you can get more features in the future!
Find Reseller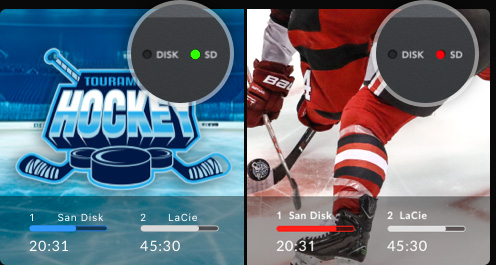
Playing
Recording
Disk Management
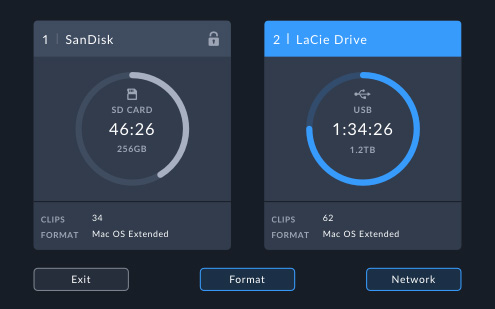
If you record to an SD card or a USB-C disk, Blackmagic OS will pre check the media to ensure it’s OK for recording. The LED will illuminate green while it’s checking the media. When recording the LED will be red, and green when playing. You can see the current record disk in the media menu or LCD.

Network Recording
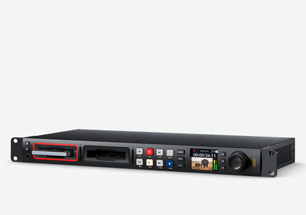
With HyperDeck Shuttle, you can record and play from centralized network storage. This means that you don’t have to manage media cards! The HyperDeck Shuttle 4K Pro supports M.2 flash storage cards, offering built-in network storage that editors can access through the 10G Ethernet port.

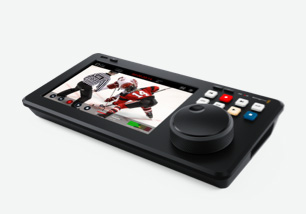
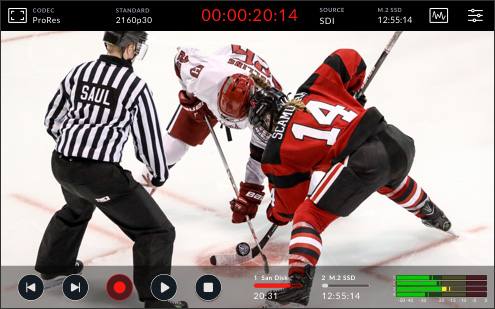
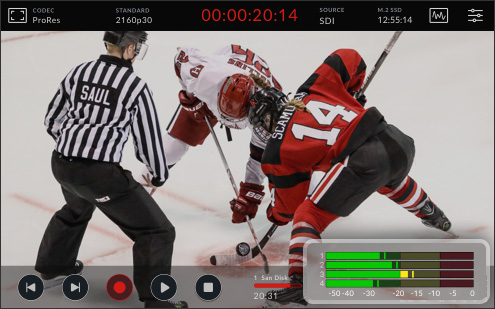
Heads Up Display
Instantly see and adjust the most important settings with a single tap!
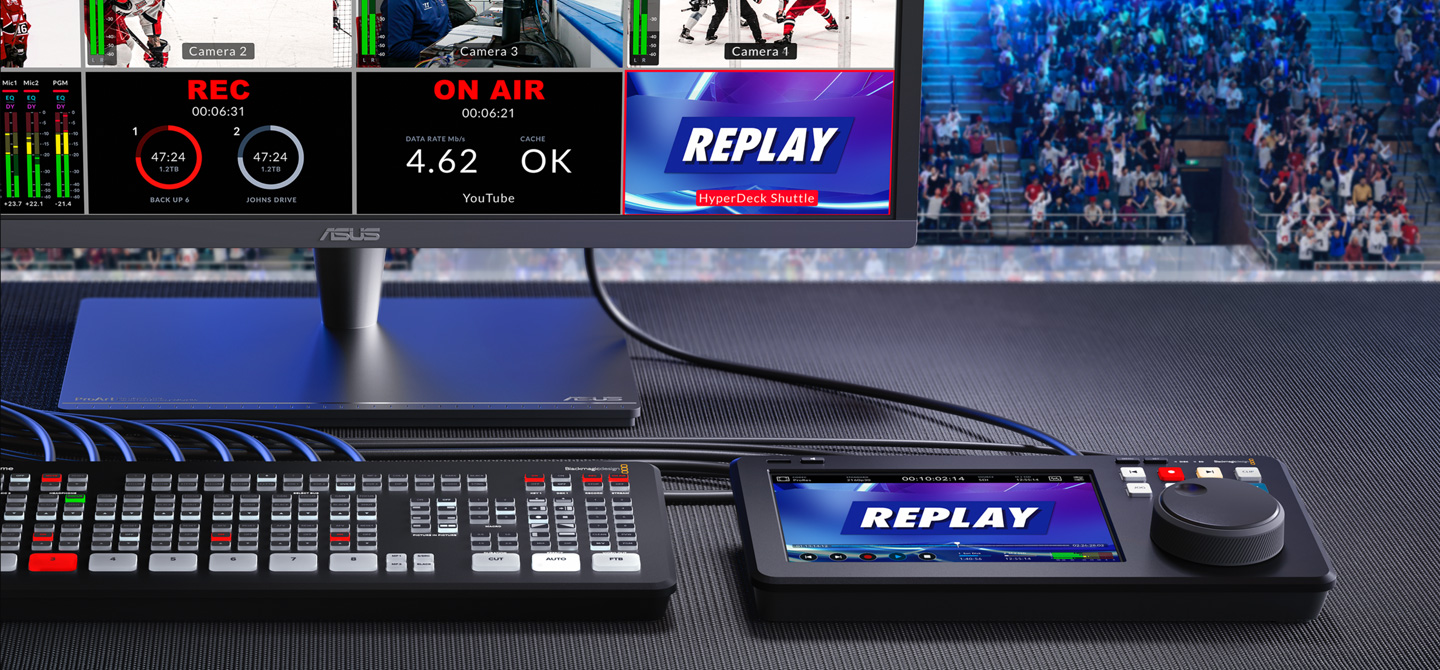
The HyperDeck Shuttle 4K Pro features a heads up display (HUD) that displays video footage of recording and playback, as well as the ability to change settings. The HUD overlays the most important settings so you can see the resolution, frame rate, codec, timecode, recording status and audio levels while you record. You can also hide the heads up display by simply swiping up or down on the LCD. For example, you can modify settings like the recording codec by tapping on the codec name or adjust the audio levels by touching the audio meters. Everything is interactive, so you can instantly change the settings of any item by simply tapping it, eliminating the need to search through confusing menus!
On Set Monitoring
The built-in LCD is specifically designed for video monitoring, but it also has a wide range of production tools! You can customize the zebra settings to check exposure, enable focus assist tools, display frame guides, grids, false color and more!
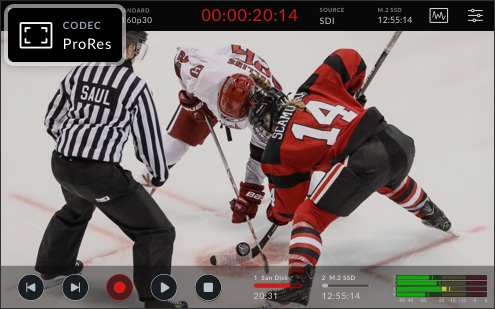
Codec
On the HUD, tap to configure the record codec and quality level. Formats include 10 bit ProRes HQ, 422, LT and Proxy as well as DNxLB, SQ or HQX. H.264 and H.265 (4K Pro) is also supported.
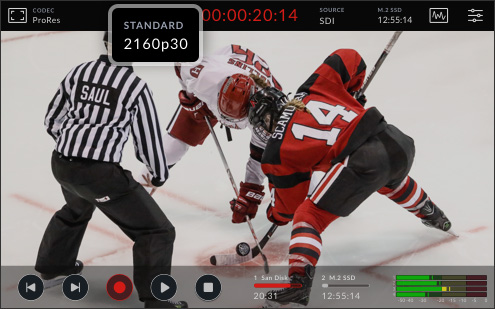
Format
HyperDeck Shuttle lets you record all television standards and frame rates. You can record in SD and HD up to 1080p60, and on the HyperDeck Shuttle 4K Pro, you can record Ultra HD up to 2160p60. The HUD will display the input video standard.

Timecode
The HUD timecode display has various options that can be changed by tapping on it. The timecode indicates the duration of your recording, which also turns red while you're recording. Tap the timecode again to set it to display the record timecode.

Source
The source indicator in the heads up display indicates the currently used video connection that's being used as the record source. Simply tap to switch between SDI and HDMI inputs. You can do it right from the HUD, without going into any menus!

Professional Scopes
The HyperDeck Shuttle 4K Pro includes professional scopes for signal monitoring. Tapping the scope icon lets you choose between waveform, parade, vector or histogram. The scope can be shown as an overlay on the video or in a smaller window.

Menus
The menu icon at the top right of the heads up display takes you to the main control dashboard, providing quick access to all settings and parameters. The dashboard has tabs for adjusting recording, monitoring, audio, setups and LUTs.
Transport Controls
The touchscreen LCD also has on-screen controls to start and stop recording, review clips, fast forward, rewind and more. The mini timeline with timecode lets you scroll through all your clips! You also get a metadata overlay with the clip name!

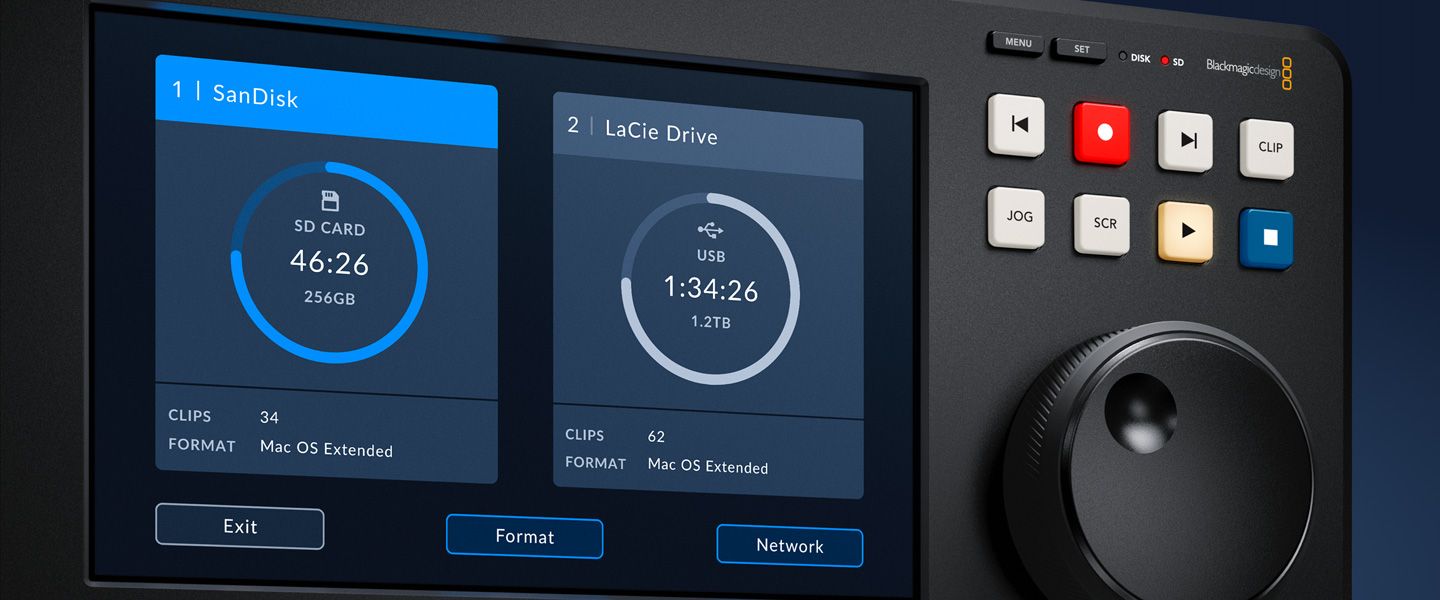
Storage Indicators
The HUD storage icons show media card, USB-C disk, and network storage details and status. You can see capacity, remaining space, clip count and format of each media card or network disk. You can also tap to mount network disks and format cards.
Audio Meters
The bottom right corner of the LCD display has 4 audio channels that can be switched between VU and PPM ballistics. Tap on the meters to adjust levels using the pop-up audio dashboard. Then change the audio input and phantom power from the menus.
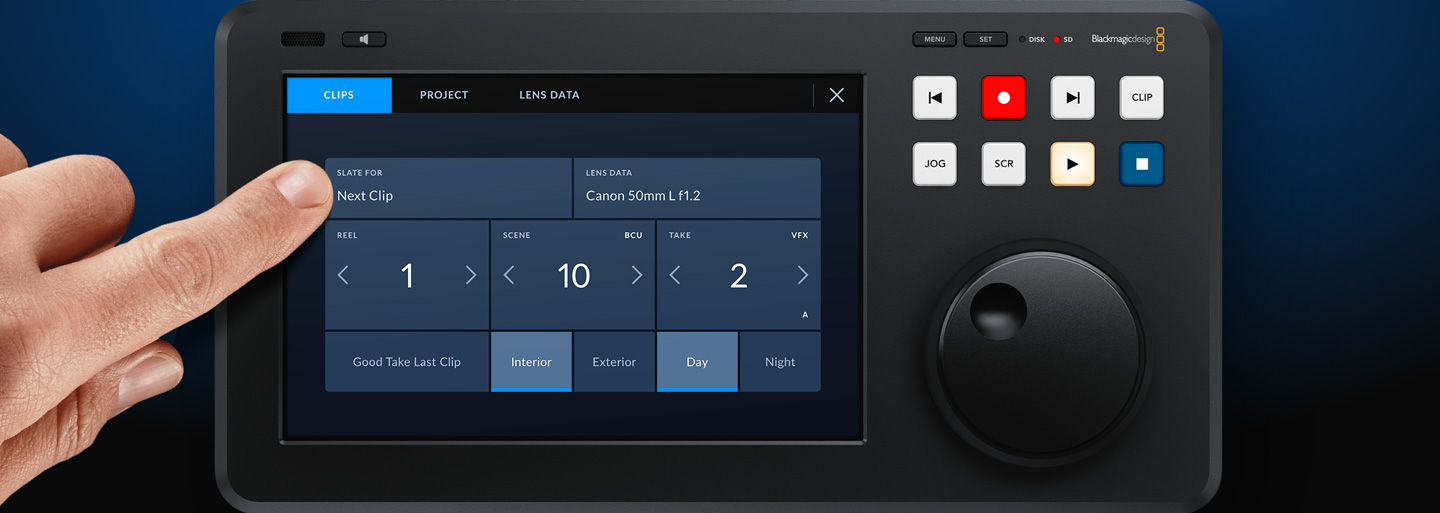
Digital Slate
Direct enter metadata for faster post shoot editing!
The advanced digital slate and metadata features make it extremely fast to add metadata to any recorded clip! Simply swipe left or right from the edge of the screen to bring up the digital slate. Take numbers are automatically incremented when you start and stop recording, so you don’t have to enter them manually for each shot! You can also set reel numbers to increment each time you format a card. All metadata is saved with the files and available in post production with software such as DaVinci Resolve!

System Menus

Record
The record menu has the main video settings for HyperDeck, including input selection and codec choice. Codecs include ProRes, DNx, H.264 and H.265 plus teleprompter setting. This menu also has options for triggering recording from the video input.

Monitor
The monitoring menu enables you to set on-screen tools like frame guides and the teleprompter. You can adjust the prompter font scaling, text rendering margins and even flip the text depending on how the prompt is mounted on your camera.

Audio
The audio menu allows you to set the number of audio channels to record, including the broadcast standard PCM format or the internet streaming AAC format. HDMI supports up to eight channels of audio and 12G-SDI supports up to 64 channels of audio.

Storage
The storage menu sets record location. That's important because HyperDeck Shuttle can record to various media types, such as SD/UHS-II cards, USB-C disks and network storage. HyperDeck Shuttle 4K Pro can also record to its internal M.2 storage.

Setup
The setup menu lets you totally customize your HyperDeck. You can use this menu to change languages, set date and time, change between light and dark mode, update network settings, select timecode source and change menu overlay.

LUTS
Display LUTs can be very useful when working with film gamma or ungraded video. 3D LUTs function by transforming the color values of video to the LCD by using a grid of data points, or table, that defines how input colors are converted.

Record Menu

Input
The input menu selects either HDMI or SDI sources for recording. On the HyperDeck Shuttle 4K Pro model, you can also see the input selection on the LCD screen. Plus, you can monitor the input selection on the dedicated monitoring outputs.
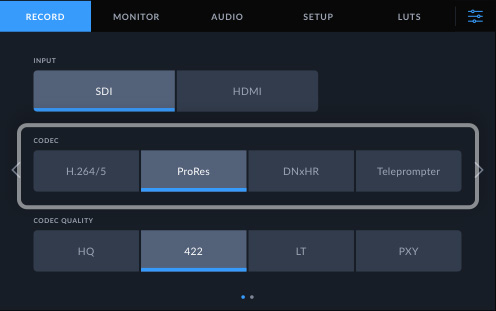
Codec
The codec menu lets you select ProRes, DNxHR or H.264 codecs for recording the HDMI input. It also serves as a playback mode selector. There is also a teleprompter option for displaying .rtf and .txt files on the HDMI output as scrolling text.
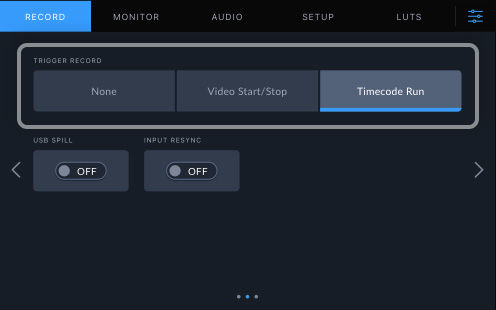
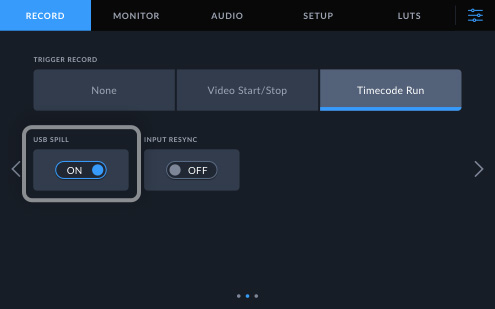
Trigger Record
The trigger record menu allows the recording to start based on the video input. This menu allows HyperDeck to watch the video input. When it gets a start/stop flag, it starts recording, or you can even record when the timecode starts counting!
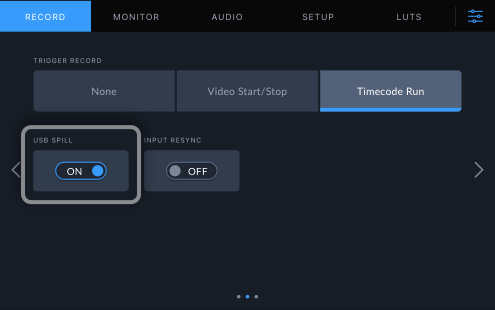
USB Spill
You can continue recording to a USB disk when the primary storage is full. By default, the recording will stop if an SD card becomes full during recording. With USB spill turned on, recording will continue to a USB disk when the card is full.

Monitor Menu
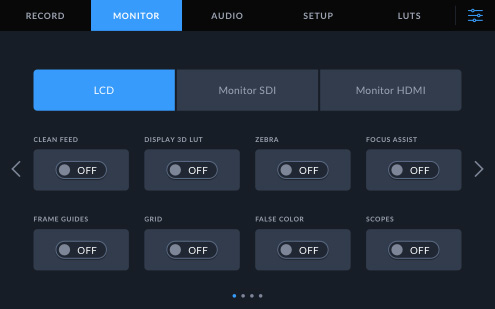
Monitor Settings
Tap on the monitor icon on the left to access the monitor overlay settings. These settings let you select and modify the appearance of overlay options, including zebra, focus peaking, guides, grid, false color, contrast, brightness and saturation.
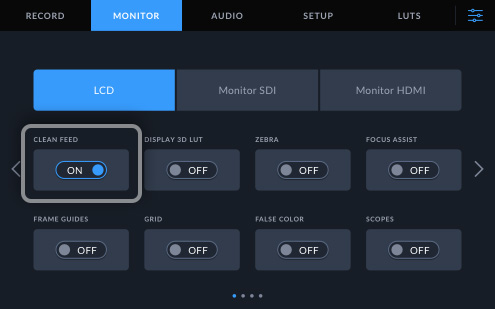
Clean Feed
The clean feed setting will disable all status text and overlays for both the LCD display and monitor video outputs. This option provides a very fast method to simultaneously disable overlay graphics on all outputs.
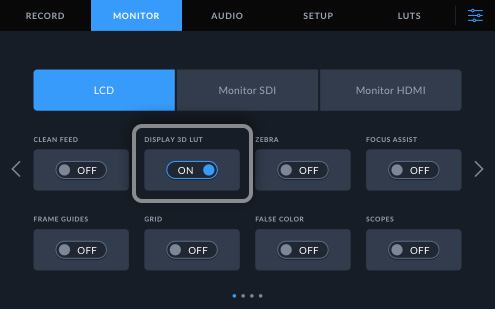
Display 3D LUT
This setting toggles the display LUTs on and off on the LCD or the monitor's SDI output. The toggle appears enabled when you have a 3D LUT selected in the LUT menu. Several example 3D LUTs are included in the LUT menu for you to choose from.

Zebra
Zebra mode assists you in achieving the optimal exposure by displaying diagonal lines across areas of content that surpass the predetermined zebra level. A level of 100% would mean that any area of the image with diagonal lines is overexposed.

Focus Assist
Focus Assist provides you with powerful tools to help you accurately focus your image. It highlights the sharpest areas of the image. In images with lots of detail or contrast, the lines can be distracting, so you can adjust the sensitivity setting.

Frame Guides
Guides provide a range of aspect ratios from various film, television and online standards. To activate the guide, toggle the switch to the on position, then select your guide by tapping the left and right arrows or by dragging the slider control.

Grid
The grid option aids shot framing by selecting overlays. Thirds will overlay two horizontal and two vertical lines on your image. The 'crosshairs' setting centers a crosshair in the frame. The 'center dot' will place a dot in the frame's center.
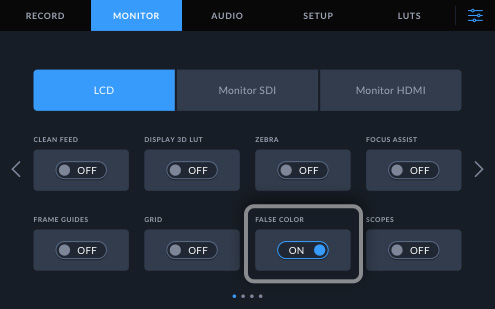
False Color
False color displays different colors superimposed on your image to represent exposure levels. For example, green is optimal for dark skin tones, while pink is optimal for light skin tones. When elements go from yellow to red, they're over exposed.

Scopes
You have the option to choose 4 different video scopes. Scopes include waveform, RGB parade, vector and histogram. You can adjust the scope brightness and opacity sliders to change the scope's view and appearance over the live video.

Teleprompter Font Size
This menu sets the font size on the prompter. You can write your script at a regular font size, such as 12 point, and then it scales up by this setting for display. This ensures the type is easy to read on camera, without scaling it up manually.

Teleprompter Line Spacing
This setting allows you to increase the space between lines on the prompter, so it can help make the text easier to read. This setting is often called leading by designers, and it allows you to open up the text on the prompter so it's not too dense.

Teleprompter Side Margin
Some monitors have overscan, or the way the mirror on the camera is designed can cause some areas to be cut off. This setting will increase margin on the sides of the monitor. A larger margin groups the text tighter at the center of the display.

Teleprompter Flip Horizontally
This setting will flip the whole prompter text horizontally on the monitor. On some cameras the prompter monitor cannot be mounted on the camera in the correct way, so this setting allows you to flip the text, compensating for this limitation.

Teleprompter Flip Vertically
This setting will flip the whole prompter text vertically on the monitor. On some cameras the prompter monitor cannot be mounted on the camera in the correct way, so this setting allows you to flip the text, compensating for this limitation.
Audio Menu

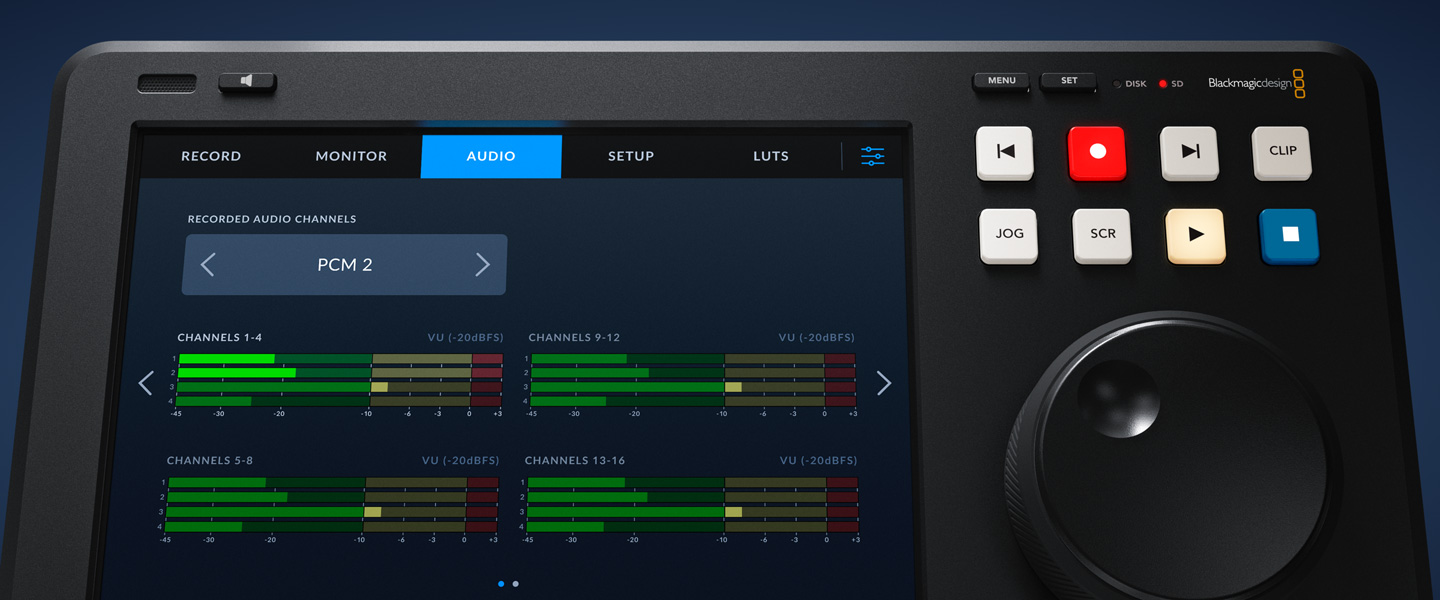
Record Audio Channels
This menu lets you select how many audio channels to de-embed from the video input. You can select 2, 4, 8, 16, 32 and 64 channels of PCM audio or 2 channels of AAC audio. Selecting 2 channels often helps with software compatibility.

Audio Meters
On-screen audio meters display the audio level with accurate VU or PPM ballistics. You can also select a different pair of channels to monitor using the monitor channels settings in the audio menu. Disabled channels will be displayed grayed out.
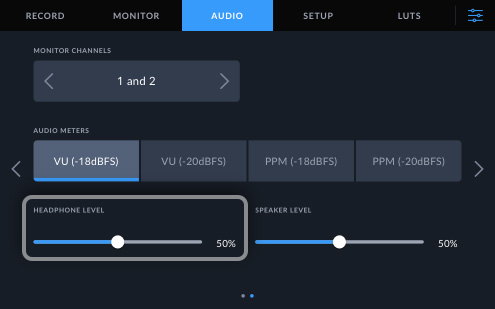
Headphone Level
The headphone level adjustment controls the output level to the 6.5mm connection located on the rear panel. To swiftly access the headphone level adjustment, simply tap the audio meters to open the audio dashboard.
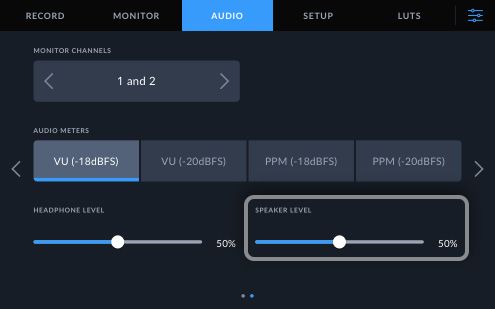
Speaker Level
The speaker level adjustment controls the output volume of the small speaker integrated into the front panel for audio monitoring. To quickly access the speaker volume adjustment, simply tap the audio meters to open the audio dashboard.

Setup Menu

HyperDeck Name
This menu shows you the custom HyperDeck Shuttle name. Custom names allow identifying multiple HyperDecks! You can set the name in the LCD or the utility software on Mac or Windows. Custom names could be Deck 1, Deck 2, or even camera numbers.

Language
The language menu lets you set the language used in the menus and on screen overlays on the monitoring output. You can change to English, Chinese, Japanese, Korean, Spanish, German, French, Russian, Italian, Portuguese, Ukrainian, Polish and Turkish.
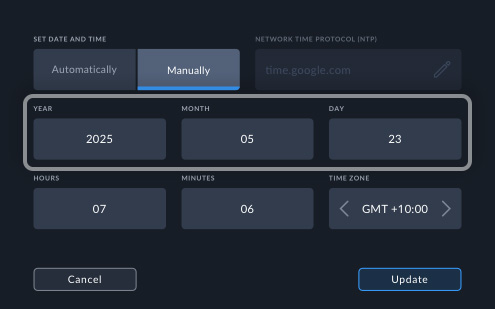
Date
The date menu lets you set the date in the HyperDeck Shuttle’s real time clock. It’s important to set the correct date so when you record files, the file date will be correct on the media disk.
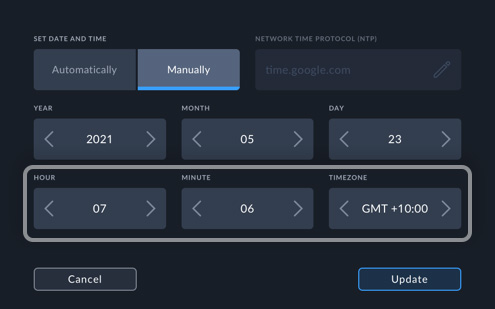
Time
The time menu lets you set the time in the HyperDeck Shuttle real time clock. The time is also used when creating files when recording. Plus the real time clock is used to calculate time of day timecode in the timecode generator.

Time Zone
Setting the timezone allows HyperDeck Shuttle recordings from all around the world to be synchronized to a universal time.
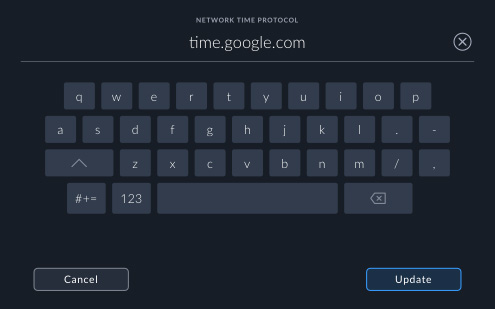
Time Server
You can select to update the HyperDeck internal real-time clock manually or from a time server. There's a default time server set on your HyperDeck and if it's connected to the internet, it'll automatically keep the time perfectly synchronized.

Software
The software menu lets you know the HyperDeck Shuttle software version. You can update the software using a computer connected via USB or Ethernet. We often release updated software with new features, so this menu lets you know you are up to date!

Camera Number
The camera number allows you to select a camera number for the metadata camera# tag in the recorded files. Entered as a letter, this allows software to detect between cameras such as when using the Sync Bin in DaVinci Resolve for multi-cam editing.

Default Standard
If the HyperDeck does not know what video standard to use, it will use this default. It will always record the video input standard. It will always playback the format on disks. If there are multiple formats, it will use the default standard first.
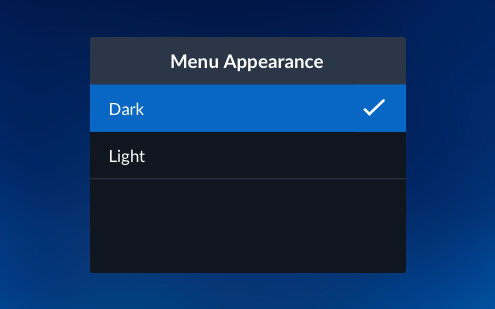
Menu Appearance
The menus on the HyperDeck Shuttle HD overlay can be set to either light and dark appearance. The light background has black text. Dark appearance has a black background with white text. The dark appearance is great for control rooms with low light.
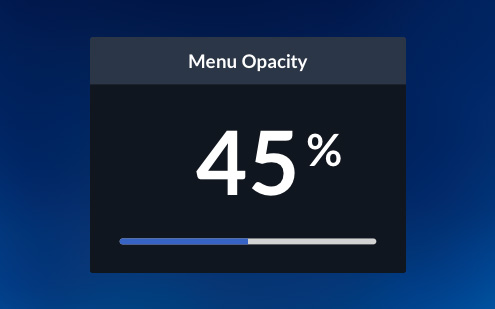
Menu Opacity
HyperDeck Shuttle HD uses menus overlaid on the video output, so it can be nice to change the transparency so you can see the image details below the menus. This setting will allow you to increase and decrease the transparency of the menus displayed.

Menu Position
Depending on the work you do, you might need to move the HyperDeck Shuttle HD menu overlay to a different location on screen. Move the menus to the top left, bottom left, top right, or bottom right. The default setting is bottom left of the screen.

Network Protocol
The network protocol menu is how the HyperDeck Shuttle will connect to the Ethernet network. You can choose DHCP where the HyperDeck Shuttle will get assigned an IP address automatically, or static IP where you can set the network address manually.

Network IP Address
The IP address will be set automatically if you are using DHCP in the network protocol menu. If you are using DHCP, this is the assigned IP address, however if you have static IP, this menu is where you enter the address manually.

Network Subnet Mask
The subnet mask setting is a technical setting and lets your network administrator create a logical subdivision of your IP network. You don't need to change this setting if you are using DHCP, or you can enter in a value if using a static IP.

Network Gateway
The gateway is the address of a computer or network router on your network that forwards data to other networks, such as the internet. This setting is assigned automatically when set to DHCP, or you can set this value manually when using static IP.
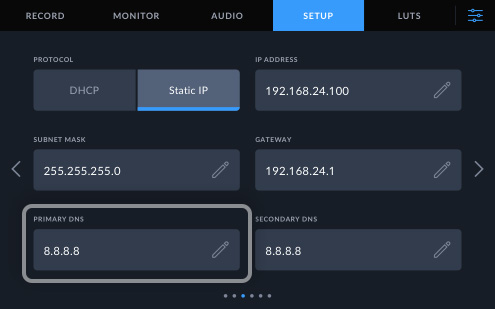
Primary DNS
The primary DNS setting is a network setting and is used when the HyperDeck needs to translate a human-readable hostname into an IP address. This setting allows the HyperDeck to find and communicate with a DNS server to lookup the hostname.

Secondary DNS
The secondary DNS setting is as an alternative DNS server that the HyperDeck can use when translating a human-readable hostname into an IP address. This setting allows the HyperDeck to find and communicate with a DNS server to lookup the hostname.

Timecode Input
The timecode input is the source used when recording video. The video input setting can use embedded SDI or HDMI timecode sources. Or you can use the "last clip regen" to use the timecode from the last recorded clip, or even a specific preset value.

Timecode Preference
The timecode preference lets you use either drop frame or non-drop frame timecode. When set to drop frame, the LCD timecode will change to use semicolons. Drop frame timecode is used for correct time of day timecode when using 59.94 fps standards.

Timecode Preset
This menu lets you manually enter the timecode to use for recording. This means you can preset the timecode generator to a specific time before recording starts. Most broadcasters start recordings at 1 hour timecode, but you can use any time!

Timecode Output
The timecode output menu changes how the HyperDeck Shuttle embeds timecode into SDI and HDMI video outputs. Normally, you get a constant timecode out for the whole playback. However, changing this menu lets you use the timecode in each playback clip.

Reference Source
Selects the reference source from the 3 options. Auto mode defaults to external if a signal is connected to the rear panel's REF input. The input setting will lock the to the video input. The external setting will always lock the external REF.
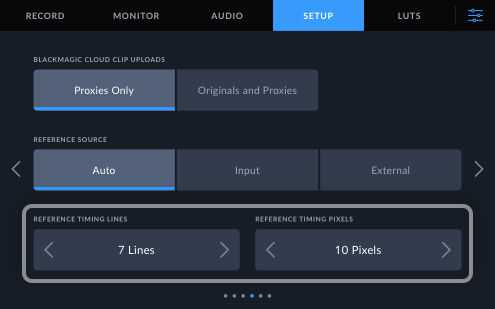
Reference Timing
The reference adjustment allows you to adjust the timing of the video outputs of your hardware in relation to the video reference input. This is commonly used in large broadcast facilities where precise timing of the video output is crucial.
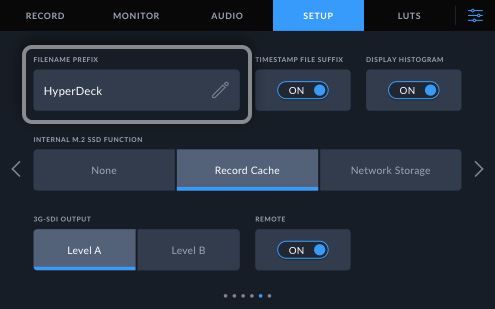
Filename Prefix
When recording files, the HyperDeck can add specific text as the start of the filenames used on the recorded media clips. This setting allows you to customize this name. You could set it to the HyperDeck name, a camera number or even a job name.

Timestamp File Suffix
The lets you enable an additional timestamp to be added to the end of the recorded file name. This setting is off by default. If you would like the date and time added to your file name, simply turn this setting on.
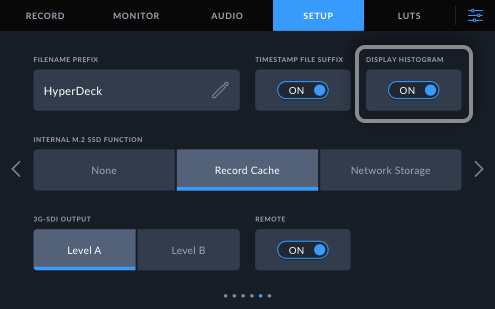
Display Histogram
This setting enables or disables the RGB histogram display located on the lower left corner of the LCD. To enable the histogram display, toggle the "display histogram" switch to the "on" position.

Internal M.2 SSD Function
Selects the M.2 SSD between record cache, network storage or disabled. Network storage will record internally to the M.2 SSD and share files over the network. Cache will spill over to the M.2 SSD if the media is slow or the network disk is lost.

3G-SDI Output
Certain broadcast equipment is capable of receiving only Level A or Level B 3G-SDI video signals. To ensure compatibility, please select either "Level A" or "Level B" using the buttons.
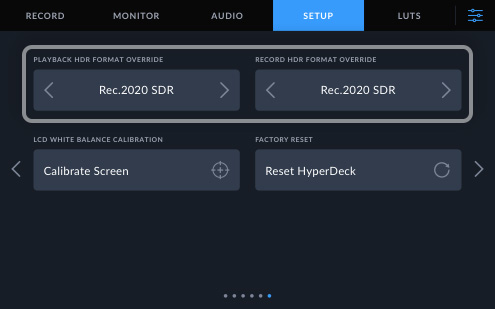
HDR Format Override
Normally HyperDeck automatically detects embedded HDR metadata and displays the image on the LCD and video output based on this information. If the video is tagged incorrectly, or your external display isn't HDR, you can override the HDR format.

LCD White Balance Calibration
To calibrate the LCD white balance, adjust the 'LCD temperature' and 'LCD tint' controls until the two reference patches appear neutral in color. After changing the settings, press the reset button to return the controls to factory calibration.

Factory Reset
The factory reset button is used to return all the HyperDeck Shuttle settings back to their default values. This is great when someone has changed settings and you want to return all the features back to a known state for your next job.

Remote
This menu sets the remote on and off. When on, deck control from Ethernet will be enabled. When off, you can still read deck status, as only control is blocked.

LUTS
Display LUTs can be applied for the LCD display as well as the SDI monitor out. To select a 3D Look Up Table (LUT), simply tap on it in the list. The LUT will be highlighted in blue and then you can click the button to make it the current 3D LUT.
Storage Menu
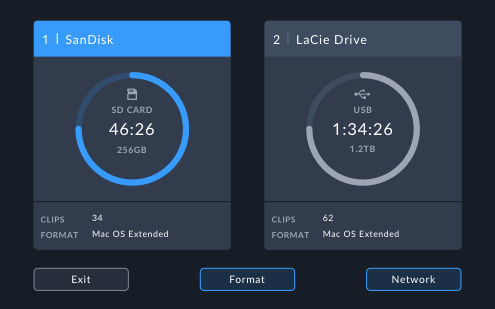
Media 1
The media 1 menu is always set to the SD card slot at the rear of the HyperDeck Shuttle HD model.
Media 2
The media 2 menu is set to the USB-C expansion port on HyperDeck Shuttle HD models. If there are multiple disks connected by USB-C, you can use the media menu to select which disk you would like HyperDeck Shuttle to use for recording and playback.
USB Spill
This setting allows you to continue recording from the SD card onto a USB disk. By default, the recording will stop if the SD card becomes full during recording. With USB spill turned on, recording will continue to a USB disk when the card is full.
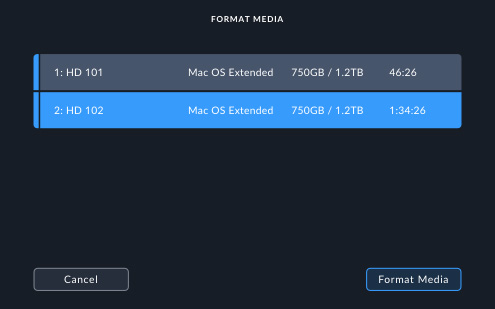
Format Media
The format menu allows you to erase and format a media disk on HyperDeck Shuttle HD models. This means you can format media from the HyperDeck without moving it to a computer. Disks can be formatted to HFS+ for Mac or ExFAT for Windows and Mac.